Tuesday, 31 January 2012

How's the Weather Where YOU Are?

I forgot to post this a few days ago. It is a video that I took while I was at the beach feeling the absolutely relentless power of thrashing winds and crashing waves. Here are some photos to get you in the mood:


Even the seagulls were timid as they gazed into the sea. 
As you can see, it was a completely moody and intense day. I had to shoot a short video to really capture the sounds of the wind gusting and the waves crashing. These sounds alone make this one-minute clip worth watching!

(oh, and I made the mistake of filming part of it "sideways" to show more of the ocean. I quickly realized my error in terms of the final result, and righted the camera back to its optimal viewing angle.)

Monday, 30 January 2012

Destiny

This weekend I've been thinking a lot about Destiny.

For those of you who don't know, I teach French and beginner art to secondary students.

But.

Am I destined to be a school teacher?

I do love my students so much. The reason I became a teacher in the first place was to inspire youth and help them learn values and attitudes that would guide them into their adult years.

I do feel that I accomplish that to a fairly considerable degree, but I find that my own growth and progression has been stalling lately.

I can't help thinking:


Is this it? Is this to be my existence, my routine for the next 25 years?


I decided to turn to my art journal to try and express myself creatively. I still haven't found an answer; I suppose it will come to me over time.

In the meantime, here is my creative result. I think the right-hand fish's outfit makes me feel the ultra satisfied with this page. That, and the pink crown on the left-hand fish.

"Bigger Fish"
Materials: Acrylic background, ink markers, paint markers, chalk pastels, magazine collage.

Friday, 27 January 2012

Day 3 of 3 - My New 16-Page Handmade Journal Inspired by Teesha Moore

These past three days, I've been sharing some of my new art pieces that I've been creating in my new, handmade 16-page book after watching Teesha Moore's series of videos here.

Hopefully you're inspired to make your own personalized book and step into a fun and interesting form of creation!

My favourite girl so far.
Materials: Acrylic background, magazine collage, chalk pastels, ink markers, paint markers, stamps & Stayzon Ink pad.


Thursday, 26 January 2012

16-Page Book Inspired by Teesha Moore - Day 2 of 3

As I said yesterday, I am sharing some of my new art pieces that I've been creating in my new, handmade 16-page book after watching Teesha Moore's series of videos here.

Are you inspired?

Materials: Acrylic paint background, magazine collage, black ink markers

Wednesday, 25 January 2012

WIWO Wednesday - It's What I'm Working On

Last Friday I showed you some designs and a video from one of my artist idols, Teesha Moore.

What I DIDN'T tell you is that I've been watching her videos (which are pretty much the same as free online courses) and following her steps to create my own beautifully bizarre images.

I've enjoyed exploring Teesha's style of art so much that I decided to make a 16-page book inspired by one of her videos and create every page in this style. It's only about half finished so far, but I wanted to give you a look at what I've been working on.

Today, tomorrow and Friday I will be showing the pages that are "done."

I'm SO SO SO in love with these works! I really hope that you like them too and that they inspire you to watch Teesha's videos and create your own pieces of art.

This quote from Eleanor Roosevelt is one that I think of often. Isn't it inspiring?
Materials: acrylic paint background, chalk pastels, ink markers, paint markers, magazine collage. 

Tuesday, 24 January 2012

Coptic Binding Tutorial (How to Stitch Your Own Book!)

I love love LOVE making my own books. I use everything from recycled hardcovers to cardboard and cardstock for the covers, and then customize my inside papers by either journalling on them, sewing on them, assembling pretty or funky papers together, or making them more "useful" like in my 2012 planner.

I've been asked so many times how to stitch a book together.

It's actually really easy!

I've made a tutorial for you to learn from :) Let me know if you have questions or comments!

Enjoy the show !

Monday, 23 January 2012

What to Put On The BACK of Your Postcards

So we've all been busy making beautiful mixed media postcards.

Any ideas what you're going to put on the BACKS of them?

Fear not, lovelies. I have some suggestions for you!

Aren't these vintage postcards beautiful?

This one was made when postage only cost a penny!

Of course the first thing on the the list will be the recipient's mailing address. This should be the easiest thing to see on the back since a lot of the postal services now have scanners that read the address instead of having an actual person read it. Keep this in mind when you are decorating the backs...

Here are some other ideas for what you might want to put on the BACKS of your postcards:
1. The recipient's mailing address
2. Your own name
3. Where you're from
4. Your blog/website address (if you have one!)
5. Your email address (if you want encourage further contact)
6. A little message (similar to what you would write on any "vacation-style" postcard)
7. A favourite quote or saying
8. A description of how you created your art postcard and/or what materials you used
9. Paste on a moo card or your artsy business card
10. Words of encouragement - remember, another real live artist will be receiving this, so what would YOU want to read on a card?
11. Leave room for stamps!

Most importantly of all, perhaps, is to leave room for postage. Remember that if you are sending internationally, you might have to put more than one stamp on the card. Make sure the stamp(s) won't cover over any of your message!

Friday, 20 January 2012

My Fake Romance With Teesha Moore

*Just a reminder that today is the
LAST DAY to sign up for the
International Mixed Media Postcard Swap!

In the meantime, here's a little eye candy for you.

By Teesha Moore


By Teesha Moore

By Teesha Moore

Have you been wondering where to start when working on your postcards?

I have recently watched the entire series from Teesha Moore on how she assembles her amazing journal pages and I thought that a lot of the ideas are so postcard-friendly

I decided to post the video below on here since she is a major inspiration for my own work. All of her videos can be found at http://www.teeshamoore.com/.

She takes these two pages from start to finish in her overall series, so they're really interesting to watch. I really thought that watching her go step-by-step was great, since I am in awe of some of her other pages.

I love how she fills her pages right up and makes them look energetic without being overcrowded.

Sit back and enjoy the process, Lovelies :)


Thursday, 19 January 2012

Imitation Fosters Creation


Simple, stylised tree. I don't know who made it.
If it is your work, please let me know! 


I came across an amazing watercolour tree a couple of years ago.

I loved its simplicity.

I loved how the "leaves" were perfectly round.

I loved the little birds.

I printed it off the computer and I pasted it into one of my art journals for future inspiration.


Last year I decided to dabble in watercolours (now one of my favourite media!) My first attempt was to copy the tree.

I really liked how the watercolours allowed the leaves to take on different hues and shades. They definitely came to life more than I had imagined. I was definitely hooked on watercolours from then on!


My imitation of the perfect tree. It definitely pales in comparison, yet when viewed on its own it has a voice.

This afternoon I decided to re-create the image again using crayons. I had a lightly coloured background and took different shades of green and brown to create my tree.

My tree in using crayons.
When I look at my own trees in my art journal, I like them a lot! In fact, I think they look pretty awesome for their own reasons.

It's only when I put them up against the inspiration piece that I get grumbly and discouraged.


 What do you think about art imitation?

Wednesday, 18 January 2012

WIWO Wednesday - It's What I'm Working On.

Zombie Girl

Materials: Magazine clippings, acrylic paint background, felt pen, alphabet stamps + Stayson black inkpad

Tuesday, 17 January 2012

A Woman's Heart

I did a simple spread around a quote that I thought was quite moving: "A woman's heart is a deep ocean of secrets."

I thought that the typical heart symbol was a little too stylised for this quote, so I printed out a medical diagram of a heart and worked it into the opposite page.

I might add more to it, but right now I really like the simplicity of this spread.

Monday, 16 January 2012

Napkin Art!


I joined a lovely group of girls called the Sisters In Art Society (SAS) this past weekend. They meet once a month about 45 minutes south of where I live, just south of the Canada/US border in Bellingham, WA.

I can't believe how inspiring it was to sit and chat with other people who share my love of art. Not only that, but we all love the same STYLE of art - mixed media!

In case you didn't know, I live in British Coloumbia, Canada.
My hometown of White Rock is about 5 minutes from the
Canada/US bordering state of Washington.

Once you open your mind to mixed media as an art form, the posibilities of creation are endless. Truly! There are so many ways to create art.

Off the top of my head:
- painting
- photography
- collage
- stencils
- drawing
- sketching
- sewing
- knitting
- crochet
- embroidery
- origami
- doodles
- zentagle
- sculpture
and on and on and on!

So at my first (of many to come!) SAS meeting, I managed to get my hands on a few nifty napkins.

Paper napkins are AWESOME for mixed media and collage because of their tissue-paper-like thickness. The ModPodge or acrylic mediaum seeps right into the napkin.

Here is a spread that I started at the meeting and then finished off at home.

I LOVE the black background in these napkins on the left. I used two different napkins here: one with the floral pattern and the other torn into smaller pieces of the butterflies. I then pasted on the doily heart and used my Sakura White Jellyrool Pen to highlight some of the flowers and forms that I liked the most :)

Here is a close-up of the red doily and blue flower outlined with my white jellyroll pen. AWESOME!

To the left of the Eiffel Twoer image, I did some zentangling of a brick wall. I like the structured images together.

Here is the whole spread again. I LOVE LOVE LOVE how it turned out!

Friday, 13 January 2012

Zentangle-rific!

I've really been enjoying my zentangle exploration. I came across http://www.tanglepatterns.com/ and now it seems like my love affair with doodles is limitless!

Here is my latest page, "Be Love." It started with a plump, upside-down heart.

Thursday, 12 January 2012

Spring? But it's still January!

I rode my bike to work yesterday.

Sure it was chilly (three degrees Celsius), but Judith Winchester III needs exercise now and then.

And alas, so do I.

As I breezed my way to work, I came across a magical sight.

Blossoms.

Pink blossoms.

On January 11th.

I pulled over and snapped a shot to share with you...
the beauty of January.


Wednesday, 11 January 2012

WIWO Wednesday - Postcard Swap Prep - MY Postcards


I'm getting my groove on to make 10 postcards!


This is my inspiration - blue, green, white and purple fabric. 
I love watching watercolours move and bleed as they dry... Isn't this pretty?

Even though I used watercolour paper, the cards still curled up when I applied the paint to them.

I've decided to make 12 cards so that I can send the two extras to some special international friends :)
How's your process going?? Post links to your postcards in the comments section so that we can all see!


Tuesday, 10 January 2012

Orange is Overrated

I know some MEGA orange-lovers.

One of my favourite bloggers is Tula Jeng over at Whorange. She can't get enough orange.

I can't get far enough AWAY from orange.

To humour the orange-lovers of the world, I decided to try a page in my art journal completely dedicated to orange. I found some orange origami paper and got out all of my orange crayons and felts. And then I created.

I couldn't finish fast enough. It wasn't therapeutic or calming like art journalling usually is for me, it was painful, stressful and I felt anxious....

After this experience, I looked up the meaning of the colour orange. Emily Gems says that orange can be used to increase creativity. Hmph. Orange also increases the craving for food, which is a bit bizarre. I don't have any orange around my house yet I'm always feeling snacky...

Anyhow, here it is, my simple, couldn't-finish-fast-enough orange page.

Monday, 9 January 2012

The Philosphy of Love

 Angels have no philosophy but love.
Materials: Acrylic paint, white Sakura Jelly Roll pen, paper towel, magazine cut-out, sharpie fineliner.

Materials: Acrylic paint, white Sakura Jelly Roll pen. 

Materials: Acrylic paint, foil stars in silver and gold.

Friday, 6 January 2012

DIY Bathroom Decor

Bathrooms. Not the prettiest room in the house.

I don't know about you, but on the back of our toilet there is a spray can of room deodorizer for those "less fresh" moments. How UGLY is that? The toilet is ugly enough, but then we have to keep a can of room spray on the tank. Yech!!

My mother-in-law showed me a way to pretty up your bathroom by hiding that ghastly can of spray for FREE!

Supplies (all on hand):
- empty Pringles chips can
- tissue paper in a colour that matches your bathroom
- mod podge
- trinket, fake flower or figurine (optional)

When I saw the full-sized Pringles chips at my local dollar store for a buck apiece, I snapped up two cans!

Once you've emptied the can and given the inside a wipe with a dry paper towel, give the outside a coat of ModPodge.
Oh, and you can put the plastic lid aside - we won't need it for this project.

Our 1950s house came with a blue toilet, so I'm using a royal blue for the tissue paper.
I put a full layer of plain tissue paper down first so that I could be sure that none of the can showed through.
You can see my pretty tissue paper on the table.
Make sure that you cover the whole can, including the bottom, with this first layer.

Once you've covered the can and bottom completely with one layer of tissue paper, apply another nice coat of ModPodge for the pretty paper.
I placed the pretty paper upside-down on the table and just rolled my can onto it.

Make sure that you completely cover the solid bottom of the can, and tuck your loose ends into the opening with more ModPodge to stick it down. 

Here is what my can looked like with a full layer of the pretty paper.
(This is the bottom, but it will be the top when we put it to use in our bathroom!)

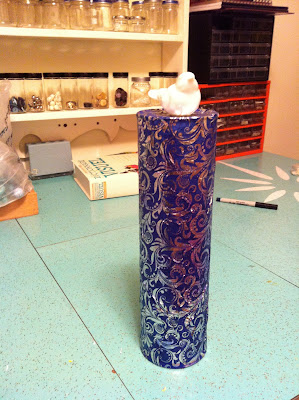
You can use your can as seen in the previous photo, or add a little something to make it even more awesome. I chose this little porcelain bird, but you can add anything from fake flowers to Scrabble tiles to river rocks - whatever you'd like!
I glued my bird on with carpenter's glue, but depending on your trinket, you could probably use a glue gun.
The finished product with the can bottom as the decorative top.
The spray can of room deodorizer will be underneath it. Just lift up your new decorative cover when you need to access it!

And here it stands on our throne. A little bit of pretty in a bathroom can't hurt :)
("Frog Girl" original art by Laurel Swenson  http://www.laurelswenson.com/  )


Thursday, 5 January 2012

Breaking Into a New Journal

I started a new Art Journal (insert giddy giggle here). Some people are afraid of a big empty book. It's too daunting, a big commitment, or just too blank. Not me.

I have one thought when I start a new journal:

I get to create ART in this journal. ART!

I was at a loss for how to customise the cover of the book until I went over to my friend Violette's house. (If you haven't visited Violette online, shame on you!)

While I was there, I met the Colour Goddess. One look into her crystal green eyes and I KNEW that we were destined to be together - in art.


My new Art Journal cover!

I etched out a square in the middle of the cover in order to make room for her.
Pretty big commitment, huh?

But alas, isn't she gorgeous?

Wednesday, 4 January 2012

WIWO Wednesday - It's What I'm Working On.

The last couple of days I've been really engaged in creating my first zentangle. Similar to mandalas, zentangles are supposed to be really therapeutic because they take FOREVER to complete.

This is pretty helpful to me, since I focus a lot on the final product and have a hard time slowing down to enjoy the process.

I've taken photos of my first zentangle step by step. I used two pens: a Sharpie fineliner and a Sakura Pigma 1.

This page is a pretty important one to me since it is the inside cover of my new journal ie: it had to be PERFECT.

Is it? You be the judge!

The lighting is a bit wonky in these photos, despite my attempts at brightening them. I hope you'll get the general idea...

I started out by drawing a big S and then drawing stripes through it to break up the page a little.

Coming up with different patterns for each section was the hardest part of this... 

Little by little it started to take form. I obviously tend toward organic shapes!


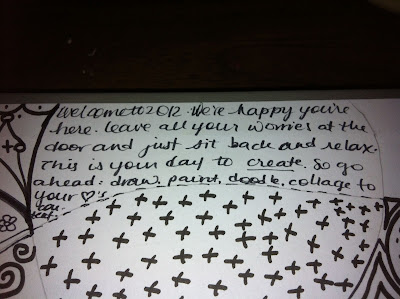
Since this is the inside cover of my new journal, I wanted to include a little blurb for inspiration.

Really taking shape now!
You can still see the general shape of the S although I made a point to not outline it directly.  

Et Voila! The finished product! My favourite pattern is the brick.
I also like the face on the left, and the tree, and the rose.. and the... just kidding.
I'm really happy with how this turned out!