Wednesday, 30 January 2013

A Customized Wall Hook

While taking advantage of some after-Christmas sales, I came across this awesome $8 decorative wall hook on clearance for a buck!

It has a heavy-duty metal hook and a solid wood plaque.
I masked off the hook and then covered the original image with layers and layers of mod-podged aqua tissue paper.
I love the texture of layered tissue paper.
I didn't take any other process photos, but here is the finished product.
Essentially I sprayed some ink through a number/letter stencil,
stamped on some white acrylic paint using the bottom of a paint bottle, and Mod Podged on a butterfly image.

The butterfly image is a stamp that I recently bought and LOVE.
I used some Portfolio Water-Soluble oil pastels to tint the butterly an orangy-sepia.
Now I have a cutomised wall hook for hanging up my coat when I get to work! :)

Monday, 28 January 2013

Frosty Gardens

We had some frost here this week.

I just LOVE the way that the frost becomes three-dimensional in the soil.
I thought I'd snap a couple of photos of the glory of below-zero gardening :)


When I was little, I used to get great joy from stamping these crystals down with my little feet.


Now I just look at them with a feeling of wonder that nature can create something so intricately beautiful.

Friday, 25 January 2013

Collection Addiction

I've recently decided that I have an addiction to collecting vintage train cases.


And yes, those are three new ones that I acquired in ONE day, sitting on the floor in the updated photo below.

But aren't they awesome?

They're also fantastic for storage!! They're useful, so my addition is ok, right?

Right??

Wednesday, 23 January 2013

My BEST Journal

I've been meaning to tell you about my Fused Plastic Bag BEST Journal.

It is probably the most fun  I've every had creating an art journal, and it has so much neat stuff inside.

Have a look:

The cover is made from fused plastic shopping bags.
There are somewhere between 8 and 12 shopping bags fused together using heat.
The front closure includes two buttons, one of which is a completely adorable owl.

This is the inside cover and first page. The inside cover holds a large envelope to tuck little papers and notes. The envelope is embellished with stickers and a strip of metal sparkle on the flap. The first page is a heavy Trader Joe's bag which was cut to size and embellished with an AWESOME kitschy deer photo.


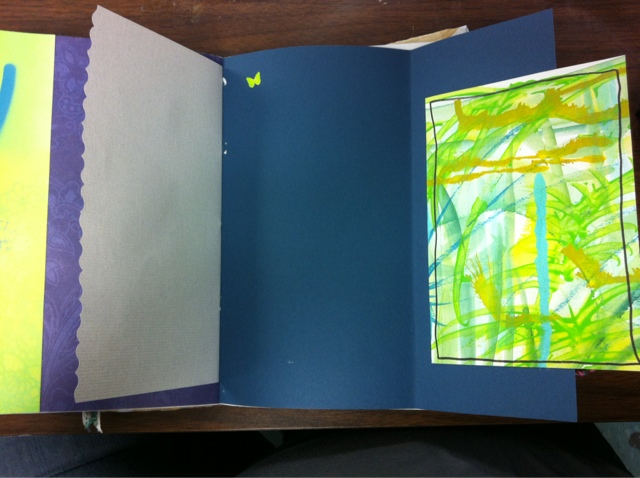
Throughout the book there are pages that are cut decoratively, additional folds and flaps for added interest, and little bits and bobs glued fastened here and there. The colourful page on the right is from my good friend Tammy Murdoch of Embellish Studios.


Lots of things to look at here, including a tip in using sheet music, a wavy edge, and a red heart doily that reminds me of a sugar skull.


This page is the inside of one of the three signatures - you can see the waxed linen thread sticking out.


A full flip-through of this journal can be seen here on my YouTube channel :)

This journal IS for sale in my etsy shop :)

Tuesday, 22 January 2013

Monday, 21 January 2013

New Ready-To-Go Art Journals!

ahhhhh. I LOVE making journals. I LOVE picking out papers and layering them together and finding great colour combinations to bind in.

I LOVE LOVE LOVE it!

My Ready-to-go Art Journals are selling like hotcakes in my etsy shop, so I've been making a new batch every couple of weeks. This also means that I get to buy new, cool papers whenever I see some (read: feeding the habit!)

I made 7 new ones last week and had only two left for this photo shoot!

I tried my best to show you what I mean about playing around with the papers and colour combos...


Stone wallpaper, old calendar images, scrapbook paper, a book on iridescence in nature.... *swoon*!


These are all separate pages/flaps.


Here are the juicy spines. Just LOOK at all those different papers!! LOVE IT!!

Friday, 18 January 2013

My Gluten-Free Take on An Old Favourite

I'm trying more and more to eliminate wheat from my diet.

The reasons why are for another day, but in the meantime,
here is my variation on an old favourite.
(full recipe at the bottom)

Yummy Gluten-Free Mac and Cheese
Make it tonight!

In a large skillet, fry butter and onion for a few minutes until onion is translucent. 

Add rice flour and mustard powder.

Whisk together - it looks clumpy and sticky. 

Add about 1/2 cup of the milk and whisk it so that the flour becomes removed from the onions. 
Add the rest of the milk, stirring constantly until mixture comes to a slight simmer. 
Once the sauce becomes thick and hot, add in 2 cups of the grated cheese and stir in to melt. 

I pre-wilted some spinach and pre-cooked some chicken to add in. 

Stir cooked pasta into cheese mixture, adding any of the various extras you wish. 

Pour into a large casserole and top with remaining 1 cup of cheese.
(Yes, that is the Pyrex Snowflake pattern! *swoon!*)

Bake at 350 for 30 minutes, and then broil for a few minutes at the end to brown on top (don't leave unattended!!)

How yummy does this look?!? 
As you can see, the consistency is nice and thick - no soupy saucy mess. 


Ingredients


1 16oz package Trader Joe's Brown Rice Penne

3 tablespoons butter

3 tablespoons rice flour

1 tablespoon powdered mustard

3 cups 1% milk

1/2 cup onion, finely diced

3 ounces sharp cheddar, shredded (separated)

1 teaspoon salt

Topping:

1 cup shredded cheese

Optional for crunch: bread crumbs (using gluten-free bread, parmesan cheese, almond meal)

Directions

Preheat oven to 350 degrees F.

In a large pot of boiling, salted water cook the pasta to al dente (not quite done and still a little firm)

While the pasta is cooking, in a separate pot, melt the butter. Add the onions and saute for 2 minutes or so on medium-high heat. Whisk in the flour and mustard and keep it moving for about two minutes. Make sure it's free of lumps. Stir in the milk, whisking all the way to the bottom to incorporate the butter/flour/onion mixture. Simmer for ten minutes or until it becomes thick and saucy. Add two cups of the grated cheese and stir until melted. Add salt to taste (usually about a teaspoon for us.)
Gently stir the penne into the cheese sauce and pour into a 2-quart casserole dish. Top the mixture with remaining cheese. (Sometimes I "wing" the amounts and add other ingredients, and often have some left over. I can usually get 1 REALLY full casserole dish or one large and one small one.)

Bake for 30 minutes-40 minutes. Broil for 3-4 minutes at the end if you wish to have the cheese topping brown and crispy.

Remove from oven and rest for five minutes before serving.

Variations:

All Four Food Groups: Add in some pre-cooked chicken breast and wilted spinach to cover all four food groups in one dish!

Tex-Mex: Add 2 tbsp taco seasoning to the cheese sauce, and then a can of corn and a can of beans into the final mixture.

WebRep
Overall rating
This site has no rating
(not enough votes)

Thursday, 17 January 2013

Inspirational Card Deck Swap - Feburary!!

Woo hoo! I'm in Jessica Brogan's Inspirational Card Deck Swap AGAIN! :)

This was SUCH a great swap. I made a deck of 52 inspirational cards (which was much quicker than I had initially imagined!) and I received a deck of 52 cards back - one card each from 52 separate artists!! (dreamy sigh!!)

I have yet to blog about the deck that I received, but you can click here to see how I made the cards for last year's swap!


Go look! Sign up! Enjoy! :D

(Even if you don't sign up, there is some excellent eye candy on Jessica's blog, so do yourself a favour and have a peek!)


Tuesday, 15 January 2013

Haikuesday

I got my eyes fixed
With the help of laser beams.
It was magical.

Monday, 14 January 2013

A few days off...

Hello lovelies,

I'm taking a few days off to recuperate from some minor surgery. I should be back in full swing next week!!

Thanks so much for following my blog and for supporting me in my art journey!!

xo
Shannon

Friday, 11 January 2013

Map Making

Mary Nasser and Jill Berry are MASTERS of journaling with maps and making maps into mixed media adventures.

Inspired by them today, I am working on a map of an imaginary island/peninsula.

I live on a peninsula, so I'm becoming more and more fascinated with their geographic nature. If you click on this link, I am close to the "A", about a km from the Ocean Park Pizza that is listed.

I took photos during my process, so that you can see the development of this page.


Add caption
I think that I'll go over the black lines again now that I've finished with the watercolours. I'm disappointed that the paint showed up so much over top of the black ink.

What do you think of this piece?

Wednesday, 9 January 2013

Art Journal Mixed Media Collage

I'm always working in my art journal!

Here is a spread that I made after receiving a package of collage bits from Tammy Murdock of Embellish Studios.

I collected a package of collage scraps from my studio, weighed them, and Tammy did the same. We sent each other our packages and now we both have new, cool things to work with!!


The flower on the right is a single ply of a napkin. I love how it becomes almost transparent in this piece.


Tuesday, 8 January 2013

Haikuesday

Only three days left
To be in the Postcard Swap!
Click the Swap button!

Monday, 7 January 2013

A Strawberry Dress

Recently I attended a Journal Jam hosted by the ever-talented Violette Clark.

There were 10-12 of us creative types there, and it was a complete BALL sitting and working on art together!

Here is the page that I worked on.

I had done the lady and the border before, but I wanted to add some text.

Here is an in-progress shot. You can see that I pencilled in lines to guide my word shapes.
 The writing reflects the image that I created using magazine cutouts:

Sometimes all I want is a big bouquet of pink balloons and a big strawberry on my summer dress. Then, surely I'll be happy. Right?


I doodled over some of the images with a Sharpie Paint Pen and added some swirls to the bottom.

I'm not sure if it's finished yet, but I'm really liking how it's coming together!

Friday, 4 January 2013

ATTN: Mixed Media Postcard Swap V.3.0 Participants!

The deadline to sign up is now this MONDAY, January 7th, NOT January 11th as I had previously planned.

If you are waiting until the last minute to sign up for the swap, don't miss out! Sign up this weekend!

Click on the Swap Button to the left for all of the details!


What Goes on the Back of the Postcards?

For those of you who are participating in the International Mixed Media Postcard Swap V.3.0, you may be pondering what to put on the backs of your cards!

I just finished the backs of mine. I will write a little message once the addresses are all sorted, and then I'll be ready to pop them into the mail!

Some ideas for what to put on the backs of your cards:
- click here for some images that I showed during the last swap
- write a favourite quote
- include your contact information in case the recipient wants to connect with you (optional)
- write a little note telling about what you're doing in your part of the world
- write a poem
- paste on a funny picture or stamp on something that you love
- any other ideas? Please share in the comments!


Since I featured hues of yellow on the fronts of my cards, I chose my yellow washi tapes to decorate the backs.
I had lots of paint smudges on the backs of my cards, but I'm ok with that. It adds to their creative nature.

I used my letter stamps to write out the word "postcard." I love the messy way that the lettering turned out!


Wednesday, 2 January 2013

Book Review: Doodle Stitching

Doodle Stitching, by Aimee Ray, arrived just last week! Amazon had it marked down to $9.83 and I snapped it up!

Today I had a chance to sit down and look through it, and by the time I had finished touring its pages, I *knew* I had to share it with you!

For me, one of the main selling features of a crafting book is a variety of detailed step-by-step projects. Doodle Stitching did not disappoint!

Let me show you the cover. It's cute without being cheesy, and I love the woodland-themed embroidery on the piece that is shown. (When we eventually have kids, the nursery will be woodland-themed.)

Love the way that the cover is designed. Just enough "cute" to make me want to look further.

The table of contents is so yummy! Materials and Tools, Projects, and even Patterns! 
  
And look at the little embroidery at the bottom of the page. Folky, boho, and ultra cute!
 
The selling point for me: Projects with tons of details. Materials needed, stitches used (there is an entire section on JUST stitches!!), and step-by-step instructions.
The next page shows actual patterns that you can copy and/or enlarge as you like.

There are lots of little creative touches too, if you are looking to take your embroidery to the next level. Pictured above is a suggestion for doodling right onto fabric in order to start your embroidery design.

Here is another "take it further" suggestion - using a pattern from the book and adapting it for the project or to your individual taste. I like the freedom that these little hints suggest.

Another great thing about this book is the variety of projects that are included. There are patterns to create embroidered hair bands, to embellish clothing, and stand-alone things like making a bag from scratch (sewing instructions included!) complete with embroidery.

Did I mention that the author is completely adorable? She is.

She is also a great writer with so many ideas. She has done a wonderful job making embroidery accessible to the ultimate novice (me!), while offering project ideas and patterns for those who are already embroidery masters.

Oh - for the writing junkie, there is a list of numbers in a very cool font.

One major thing that is missing is a general alphabet to use. I love including writing in my art and doodles, and I think that there is a fairly large attraction to words and letters for many artists. A funky alphabet to embroider would have been a natural inclusion to this book.

Luckily I'm pretty handy on a computer, and I found these links of cool fonts for embroidery:
http://www.needlenthread.com/2009/10/hand-embroidery-lettering-and-text.html
http://www.apairofpears.com/2012/02/embroidered-typography_20.html